Tuesday, April 30, 2013

Strawberry Orange Julius

Every month, on the reveal day for my group of the Secret Recipe Club, I try to visit the posts of as many of the participants in my group as I can. It usually takes me a couple of days, but I usually get to all of them. And they are always so inspiring - so much deliciousness!

This month, one spoke to me right away. Heather from Join Us, Pull Up A Chair, had posted this delicious looking Orange Pineapple Julius, based on the Orange Julius drink that you usually see at the mall.

Yum. It looked so good that I decided that I'd surprise the kids with that as their breakfast beverage the next morning.

Only, instead of pineapple, I used strawberries.


Yum - this delicious beverage was a fast, easy treat that both kids thoroughly enjoyed. I used coconut milk so that little man could share and I think it added a yummy sweetness, so I actually decreased the amount of confectioners' sugar called for in the recipe to compensate. And it was perfect.


So if you're looking for a quick, delicious treat, definitely give this fruity beverage a try!


Strawberry Orange Julius
(inspired by Join Us, Pull Up A Chair)


1/2 cup orange juice
1/2 cup milk (I used coconut milk)
5 - 6 strawberries
1 Tbsp powdered sugar
handful of ice cubes

Add all ingredients to a blender and blend until smooth and creamy. I used an immersion blender with no problem at all. Pour into a glass and serve right away.

Enjoy!

Saturday, April 27, 2013

April Daring Bakers' Challenge - Savarin

Holy moly, it's the end of the month already? You know what that means!

Natalia of Gatti Fili e Farina challenges us to make a traditional Savarin, complete with soaking syrup and cream filling! We were to follow the Savarin recipe but were allowed to be creative with the soaking syrup and filling, allowing us to come up with some very delicious cakes!

I am going to be completely honest with you.  I had never heard of a savarin before and, upon reading the recipe, I  thought it sounded... odd. A rich bread dough that is baked in a ring then soaked in a flavored syrup, and then the hole in the middle is filled with a pastry cream and the whole thing is decorated with fresh fruit.

Whoa. Sounded... fussy. The dough takes a bit of time, and involves steps that have to be followed in the right order... from making a starter sponge to adding 6 egg yolks one at a time to adding flour a tablespoon at a time.   But once I got started, other than it taking quite a few bowls to keep myself organized, it wasn't too bad.


I soon had a very rich, very high hydration dough ready to rest for a long rise.


And rise it did!


The dough is then shaped and placed into a well-buttered bundt pan.


And when it bakes?


Wow. Talk about rise! I was amazed at how high this bread rose in the oven.

Then came decision time. While the bread cooled, I had to decide on the flavorings for the soaking syrup and filling for this bread. I chose vanilla.  I made a vanilla simple syrup with which to soak the bread...


...and a dairy-free and egg-free vanilla pudding to use as a filling. (I chose dairy-free/egg-free so that little man could enjoy it with us. He can handle the eggs/butter in the bread, as they are fully baked in the bread, and that doesn't affect him. But for pudding, he needs the dairy-free/egg-free version).


And then it was time for the fun finishing touches. Fresh berries on top.


I have to say, once it all came together, I thought it looked pretty good!


But the important part is how it tastes. And it tastes delicious! The bread is so light and airy - little miss actually compared it to an angel food cake, which is pretty impressive for a yeasted bread.


None of us were fans of the pudding that I chose (well, little man liked it, and I guess that's the most important part for that kind of pudding!), but the soaked bread was a really nice treat, so it is definitely worth trying again.

Natalia, thank you so much for preparing this delicious challenge for us!

To see the challenge as Natalia beautifully presented it, you can check it out here.

And to see the beautiful and impressive savarins baked up in the Daring Kitchen this month, you can check them out here.


Savarin
(adapted only slightly from the challenge recipe)


2½ cups bread flour
2 tablespoons water, lukewarm
6 large eggs at room temperature, separated
½ satchel (1½ teaspoons) active dry yeast
4 teaspoons sugar
2/3 stick (1/3 cup) butter at room temperature
1 teaspoon salt
¼ cup butter for greasing the work surface, hands, dough scraper & baking pan

For the Sponge:
In a small bowl mix 2 tablespoons lukewarm water, 3 tablespoons flour and yeast. Cover with cling film and let rise 60 minutes.

For the Dough:
After the sponge has been resting for 30 minutes, put the egg whites in the mixer bowl and start working with the paddle at low speed, adding flour until you have a soft dough that sticks to the bowl (recipe said this would take about 2 cups, but mine only needed about a cup or so) and work until it comes together. Cover with cling film and let rest 30 min.
Add the sponge to the mixer bowl along with one tablespoon of flour and start mixing at low speed.
When the dough starts pulling away from the sides of the bowl, add one yolk and, as soon as the yolk is absorbed, add one tablespoon of flour.
Add the second yolk and the sugar and, as soon as the yolk is absorbed, add one tablespoon of flour.
Raise the speed of the mixer a little bit.
Add the third yolk and the salt and, as soon as the yolk is absorbed, add one tablespoon of flour.
Keep on adding one yolk at the time and the flour in this way, saving a tablespoon of flour for later.
Mix the dough until is elastic and makes threads.
Add the room temperature butter and, as soon as the butter is adsorbed, add the last tablespoon of flour.
Keep on mixing until the dough passes the window pane test (be patient with this).
Cover the dough with cling film and let it proof until it has tripled in volume, about 2 to 3 hours.
When the dough is almost done proofing, carefully and thoroughly butter a bundt or tube pan, making sure it is fully buttered but not leaving chunks of butter on the sides of the pan.
Grease your dough scraper, your hands and your work surface and then turn the dough out on it and fold it over on itself several times. Cover with cling film and let it rest 15 minutes on the counter.
Turn the dough upside down and, with the help of your buttered dough scraper, shape your dough in a rounded bun.
Make a hole in the center with your thumb and put it in the prepared pan.
Cover with cling film and let rise in a warm spot until the dough reaches the top of the pan, about 1 hour.
Pre-heat oven to moderate 340°.
Bake the Savarin for about 40 minutes until the top is golden brown.
When the Savarin is done, remove it from the oven, let it cool and carefully remove it from the pan.

For the Syrup:
(my own creation)
3 cups water
1 vanilla flavored tea bag
1 vanilla bean
1 cup of sugar

Put the vanilla bean, tea bag and sugar into a medium saucepan and cover with the water. Heat over high heat until it comes to a boil. Boil the syrup for approximately 5-8 minutes until sugar is fully dissolved, the tea has steeped well and the liquid has thickened a little bit.
Remove the pan from the heat and allow it to cool.


When you are ready to soak the cooled savarin, return the bread to the pan and carefully spoon the liquid over the bread until you can see the liquid coming up the side of the pan. The bread will begin to float, so push it down a bit to make sure it is really immersed rather than just floating on the surface.  Allow the bread to soak overnight. After a few hours of soaking, I actually covered the savarin with foil and flipped it over to allow gravity to pull the liquid down through the whole bread.


For the Filling:
You can use any pudding or pastry cream that matches your taste preferences. I made this dairy-free and egg-free pudding:
(from Z's Cup of Tea)

2 cups coconut milk beverage
2 1/2 to 3 tbsp. cornstarch
3 1/2 tsp. pure vanilla extract
1 tablespoon agave nectar

Heat 1 1/2 cups of the coconut milk in a small pot or saucepan over medium heat.
Whisk the remaining 1/2 cup of coconut milk with cornstarch separately in a small bowl, adding the milk to the cornstarch. (This makes it easier to mix.)
Add the agave nectar to the milk and pour in the remaining 1/2 cup of milk. Whisk the milk until thickened and comes to a boil, about 4 minutes.
Remove the pudding from heat and add vanilla extract.
Pour the pudding into a bowl and cover the surface with plastic wrap to prevent a skin from forming and refrigerate until ready to serve.The pudding will continue to thicken as it chills.

When you are ready to serve, turn the soaked savarin out onto a serving dish, fill the hole with the prepared and cooled pudding (or filling of your choice) and decorate with fresh fruit.

Enjoy!

Thursday, April 25, 2013

Peanut Butter S'mores "Quesadilla"

All over the food blogging world I have seen people posting about peanut butter and jelly quesadillas.  Two tortillas, some peanut butter, some jelly, cooked on a pan... Looked and sounded absolutely delicious, but I always had a kind of secret chuckle that these were recipe posts.

Then yesterday afternoon I was in the mood for a snack.  I thought about making a quesadilla. But I wanted something sweeter. Somehow the peanut butter and jelly quesadilla popped into my head.  But I'd already had lunch... I wanted something more fun.  And then I remembered that I had some mini marshmallows in the pantry.  Hmm... definite possibilities.

I spread some peanut butter on a tortilla, popped it onto a pan over medium heat, then sprinkled a liberal handful of mini marshmallows on top, followed by another liberal handful of chocolate chips.


Then I topped that with a second tortilla.  A few minutes later I flipped it over and saw what I was hoping for.


Ooey, gooey meltiness.

Now, once it's fully cooked, it flattens, so I wasn't able to get a good photo of the ooey, gooey deliciousness in all its ooey, gooey glory.


But trust me - warm, melty, chocolaty, sweet, salty, crisp - yeah. This was pretty much the perfect snack.


Peanut Butter S'mores "Quesadilla"
(I'm sure someone else has done this before, but I didn't follow a recipe...)

2 flour tortillas
2 tablespoons peanut butter (I used creamy, use more or less to taste)
1/4 cup (approximately) mini marshmallows
1/4 cup (approximately) chocolate chips

Place a pan big enough to hold your tortilla flat on a burner over medium to medium high heat.
Spread the peanut butter on one of the tortillas and place it on the pan (peanut butter side up). Sprinkle the marshmallows and chocolate chips over the peanut butter and top with the second tortilla.
Heat the tortilla until it becomes slightly golden brown and the peanut butter, marshmallows and chocolate chips begin to melt.
Carefully flip the whole thing over and heat on the other side until it is also golden brown and the whole thing is ooey, gooey and delicious.
Remove from heat onto serving plate and cut into wedges.

Enjoy!


Monday, April 22, 2013

Pumpkin Spice Granola, An SRC Bonus

I am a summer person at heart. Sunshine, warm weather, bare feet, playing outside... there is nothing better than summer. For most things. But for some reason, many of my favorite flavors are actually Fall related.

When it was announced that a few posts were missing from this week's Secret Recipe Club, of course I volunteered to help.  The hostess sent me over to Sweetly Serendipity, an awesome blog that I can't believe I've never visited before... that I can remember. I mean, seriously, Taryn was also a member of the Daring Bakers Challenge. How in the world am I not familiar with this awesome blog? And talk about some delicious recipes. Everything looked great.

But for some reason, everything that really spoke to me was pumpkin related. Well, no, an apple recipe spoke to me, too, but still - Fall flavors.

But I have been mulling over the idea of making granola again, so when I saw Taryn's recipe for pumpkin spice granola, I knew I had my recipe.

And then the hostess sent me a message saying that the missing post was found, Taryn was no longer an orphan.  I said no problem, but I think I am going to make this recipe anyway!!

Granola is pretty easy to make - it's basically just rolled oats, coated in some kind of syrup, dried out in the oven.  This version used a pumpkin-pie inspired spice mix - yum.


This recipe also included spiced nuts to be included. With little man's nut allergy, I omitted those, and decided to include a couple of tablespoons of chia seeds and a couple hands full of raisins instead.


The syrup is simply a combination of maple syrup and coconut oil, which is brought to a boil and then simmered for a couple of minutes.

Stir in the syrup...


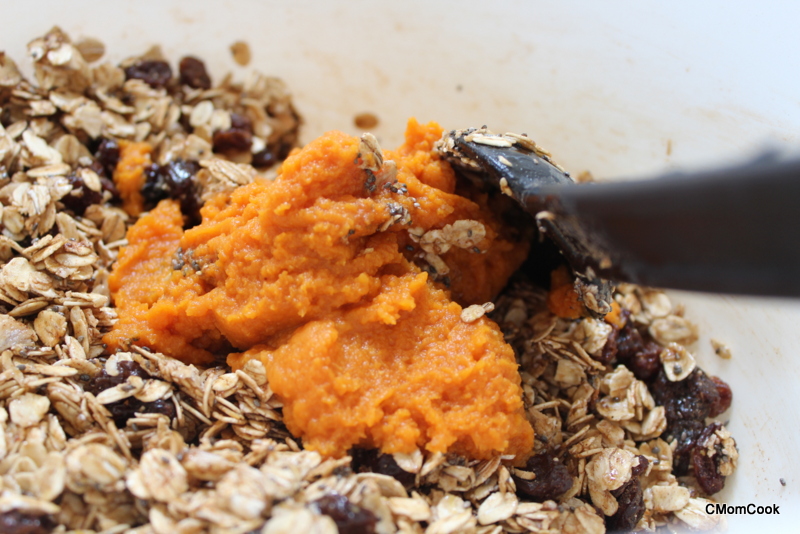
Then stir in some pumpkin puree...


Then just bake, stirring things up every few minutes.

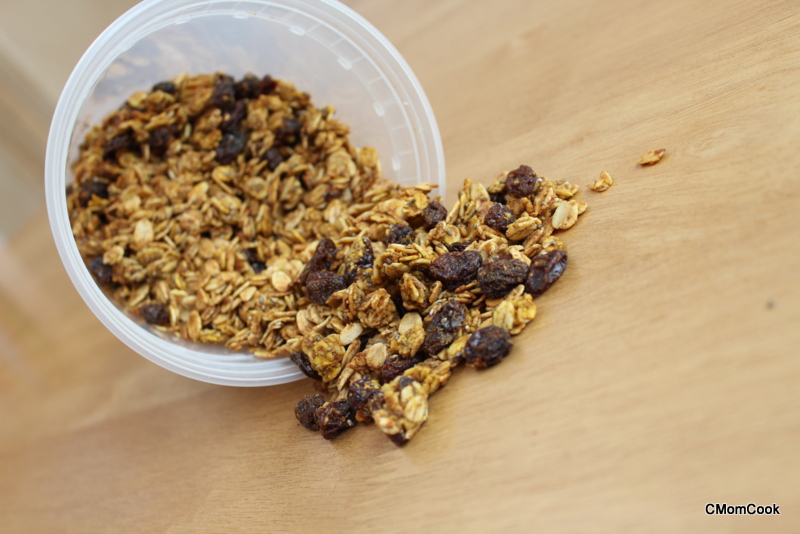
And that's it!

What a delicious afternoon snack this made - so flavorful and hearty!  I bet it will make a great breakfast tomorrow morning, too!


Pumpkin Spice Granola
(only slightly adapted from Sweetly Serendipity)

Spice Mix Ingredients
2 teaspoon cinnamon
½ teaspoon ground nutmeg
½ teaspoon ground ginger
¼ teaspoon allspice

Granola Assembly Ingredients
4 cups old fashioned oats
Prepared spice mix
½ cup maple syrup
3 tablespoons coconut oil
2/3 cup canned pumpkin puree
1 teaspoon salt
2 tablespoons chia seeds
a few handsfull of raisins (or dried cranberries)

Mix together all spice mix ingredients in a small bowl and set aside.
Place the oats, spice mix, salt, chia seeds and raisins in a large bowl. Mix well, and set aside.
Preheat oven to 325 degrees.
Combine the maple syrup and the coconut oil in a small saucepot over high heat. Bring to a boil, then reduce heat and simmer for two minutes. Very carefully, pour the hot syrup over the oats. Toss well. Fold in the pumpkin puree, and mix until completely incorporated.
Spread out granola on two large sheet pans. Bake for about 25-35 minutes, tossing every five minutes. When done, remove granola from the oven and let cool.
You can store this granola in an air-tight container at room temperature for a week or two.

Enjoy!

Strawberry Meringues

Okay, so remember that I used all those egg yolks to make homemade mayonnaise for this months Secret Recipe Club? And remember I told you I made strawberry meringue cookies with the leftover whites?  Well here they are!

These are actually pretty easy to make, but you need to plan ahead a little bit.

Because in order to get that delicious strawberry flavor, you need a couple of tablespoons of the juice that results from macerating strawberries.  Basically, cut up some strawberries, sprinkle them with some sugar, then let them rest for a few hours.  The result?


Deliciously sweet strawberries (perfect for strawberry shortcakes or ice cream topping or just digging in with a spoon!) and that juice you see there.  Just add that juice to your whipped egg whites and there you have it - naturally flavored meringue!

And those egg whites? Beat them really, really well. You want stiff peaks here. Stiff enough that you can hold them upside down.


Then just pipe out the meringue and bake it in a very low oven for a very long time.


Yummy, crispy, naturally sweet meringue cookies.

But beware.  They are extremely addictive. We finished the whole batch in about 24 hours.  Yum.


Strawberry Meringue Cookies
(from Everything in the Kitchen Sink)

3 egg whites
1/4 teaspoon cream of tartar
1/2 teaspoon vanilla extract
2 tablespoons syrup from macerated strawberries, at least 24 hours macerating
1/3 cup of confectioners sugar
pinch of salt

Preheat the oven to 200 F and line two baking sheets with parchment paper (I used foil).  Separate the whites from the yolks (save the yolks for a curd!) and begin beating with a hand mixer until the egg whites are just foamy.
Add in the cream of tartar, the vanilla extract, and strawberry syrup.  Begin to beat until the volume doubles.
Begin to add in the confectioners sugar, 1 tablespoon at a time.  Continue beating until there are soft peaks formed in the egg whites.
Add a pinch of salt and finish beating until stiff peaks are formed.  You should be able to hold it above your head!
Pour into a pastry bag or large freezer ziptop bag and squeeze out as much of the air as you can.  Pipe out silver dollar sized cookies onto the parchment-lined cookie sheets.
Bake at 200 F for 2 hours.  I left mine in for closer to three because I... umm... forgot about them for a little bit...  Turn off the oven and let sit for at least an hour before removing.

Enjoy!

Saturday, April 20, 2013

April Sourdough Surprises - Pasta

This month's Sourdough Surprises marks the celebration of a full year of sourdough fun.

To do so, Jenni and I thought it would be fun to go back to how it all started - with the two of us trying out a pasta recipe "together" - or, as together as two people several states apart can manage.

We had so much fun sharing our sourdough experiences, that we wanted to spread the love. And thus Sourdough Surprises was born!

What better way to celebrate than to share our first joint sourdough endeavor with the rest of the group?

Homemade pasta is always delicious.  And the sourdough version is not exception.


Easy to prepare and yummy to boot?

I'd say that's one great celebration.

Thank you so much to everyone who has joined in our sourdough adventure - I can't wait to see where this next year takes us!


Sourdough Pasta
(from Mummy, I Can Cook!)

80 grams (about 1/4 cup) sourdough starter
60 grams flour (about 1/2 cup) (I used all purpose, you can use any combination of flours you want)
1 large egg yolk (though I did wind up needing to add in some of the white, too, so you might want to be prepared to do so...)

Mix together the starter and egg yolk.
Sift the flour, then make a well in the middle. Pour the starter/yolk mixture into the well and slowly mix it together.
Knead into a ball. Continue kneading the dough until it feels smooth and springy. I needed to add in some of my egg white here to make my dough soft enough. It could be because I was measuring by volume rather than by weight.
Once you have a smooth, springy ball of dough, allow it to rest, covered, overnight.
On a well floured surface, roll your dough as thinly as you can (and is still workable) and cut the pasta to the desired shape.
Leave to dry for half an hour before boiling.
You can sprinkle the fresh pasta with flour and freeze it in a tightly sealed container or bag if you do not plan on cooking it right away.

Enjoy!

Monday, April 15, 2013

Homemade Mayonnaise

This month's Secret Recipe Club assignment introduced me to Sarah over at Everything in the Kitchen Sink. I have actually visited Sarah's blog to check out her SRC picks each month, which are always absolutely drool-worthy, so I was super pleased to be assigned her blog.

Sarah is a pretty awesome blogger who has been held back recently by a leg injury that has kept her out of the kitchen more than she'd like, but she's getting there. And I know when she is fully back on two feet we're going to see lots and lots of tasty treats.

I had a really hard time choosing what to make.  My first inclination was to make these Apple Streussel Muffin Bites because we like pretty much everything muffin in this house. But then I saw that she'd made homemade mayonnaise.  Hmm... that's something that had always scared me a little bit. Plus, it just uses egg yolks. What in the world would I do with the whites? So I put my laptop aside and decided I'd think it over.

The next day I went back to look again with fresh eyes.  This time, what caught my eye was this delicious sounding recipe for Strawberry Meringue Cookies.  Hmm... those look good, but they just use egg whites... What would I do with the yolks?

I bet you know where this is heading.

Yup.  Made 'em both.

Today I'll share with you the mayonnaise, and I'll share the meringues later in the week.

Mayonnaise is a tricky thing to get right, as it's an emulsion, which means that it's a mixture of two liquids that generally, on their own terms, wouldn't want to mix together.

In this case, those two liquids are egg yolks and oil.

Sarah made her mayonnaise in her food processor. I decided to use my KitchenAid mixer.

I started with the egg yolks.


I whipped those until they lightened in color and became pretty thick.  Then it was time to add the flavorings - like Sarah, I used dijon mustard, salt and pepper. You also add in an acid - usually lemon juice. Which I thought I had. I didn't. So I used apple cider vinegar and hoped for the best.


Once the acid and flavorings were mixed in it was time to add the oil. This is where you have to be super careful. You need to add a lot of oil - almost two cups (sometimes a little more!), and you have to do it slooooowly. Especially in the beginning. Seriously, I was drip-dropping a quarter teaspoon of oil into my yolks at a time for the first quarter cup of oil, then I slowly drizzled about a quarter cup more at a time in a very thin stream.

Now, I had no idea how I'd know when my mayonnaise was, well, mayonnaise. I kept hoping to peer into the mixer and see something magical.

And, believe it or not, one and three quarter cups of oil later, I did!  It looked like, well, mayonnaise!

I was still a little worried - while my mixer was working, I did a quick google search on making mayonnaise in a stand mixer (nothing like preparing ahead of time...), and found a lot of people warning that they prefer to do theirs by hand - that making it in the mixer, often times, the mayonnaise breaks (separates - remember - those liquids don't generally want to combine!).  So the true test came when I transferred the mayonnaise from the mixer bowl to my jar and let it sit for a few minutes.

And guess what?


It stayed together! Woo hoo!

Now, I am going to be completely honest with you here... I wasn't the biggest fan. It's not bad, but it wasn't "wow!" like I was hoping for. I am not sure I am going to be making my own mayonnaise from now on, but it's very nice to know that I can.

And it left me with those egg whites, which yielded very popular results, as I'll share later this week.

Sarah, I can't wait until you are full-force back in the kitchen, and I thank you for your awesome inspiration this month!


Homemade Mayonnaise
(from Everything in the Kitchen Sink)


3 egg yolks
5 tablespoons lemon juice or vinegar (I used apple cider vinegar)
1/2 teaspoon salt
1/2 teaspoon dijon mustard
2 cups of extra virgin olive oil
pepper to taste
1/2 tablespoon honey (optional)

Mix the egg yolks together in a stand mixer fitted with the whisk attachment, at high speed, until they are thick and have lightened in color.
Add the lemon juice/vinegar, mustard, salt, and pepper and continue to mix on high.  Stream in the olive oil very slowly, only a few drops at a time during the first 1/4 cup (I used a quarter teaspoon measure to slowly drip the oil in for the first quarter cup).  Use anywhere from 1 1/2 cup to 2 1/4 cup . . . I ended up using 1 3/4 cups.
Taste and season with salt and pepper as needed.  I added a little squeeze of honey to balance the flavors.

Enjoy!


Related Posts with Thumbnails