Showing posts with label candy. Show all posts

Thursday, March 27, 2014

March Daring Bakers' Challenge - Nougat


The March 2014 Daring Bakers' challenge was hosted by Rebecca of BakeNQuilt. She challenged us to learn to make classic nougat and to make it our own with our choice of flavors and add-ins.

Nougat.

From the moment I saw this month's challenge, I couldn't wait to get started.  

Now, the nougat that we were making here is not the same nougat that most of us think of from candy bars. This nougat is more closely related to marshmallows, and is a sticky, chewy, sweet candy, usually with nuts mixed in. And I couldn't wait to try it.

As I am completely comfortable with making marshmallows, I wasn't intimidated by this process. There were only a few differences.

The first difference is the syrup. The syrup for nougat is made with honey, where marshmallows are made with corn syrup.


The syrup mixture is then carefully heated and boiled, whcih is where this comes in handy.


I boiled my syrup until it was 280 degrees.

While this was cooking, I prepared the other half. Whipping up an egg white. For my marshmallow recipe, I use gelatin. For these, it's more like traditional marshmallow cream recipes - egg whites whipped to soft peaks.

And then I carefully and slowly poured the syrup down the sides of my mixer, which was beating at full speed.


This is whipped up at high speed for about 10 minutes. Just like marshmallows.

This is the time when any mix-ins can be... well... mixed... in. Even though, due to the raw egg whites, I knew little man wouldn't be tasting these, I still opted not to mess with nuts (don't want to contaminate my mixer or anything). So I thought... why not chocolate chips?


In theory, not a bad idea.  But let me warn you... the nougat is still warm at this point. Which makes stirring in chocolate chips...


...a little messy.  But once it cools down, it looks kind of marble-y cool.


So I cut it into pieces and we tried it!


This stuff is fun. But a little goes a long way! And it is definitely sticky! I am sure that, depending on the temperature of the syrup, you can play with the consistency a bit, and I bet it's really good with other things mixed in.

Seriously, this was an awesome challenge. Rebecca, I can't thank you enough!!!

To see the challenge as Rebecca presented it, check it out here.

To check out the amazing nougats prepared in the kitchen this month, check them out here.


Nougat
(from Joy of Kosher)

Nonstick vegetable oil spray
1/2 cup honey
1/2 cup sugar
1 large egg white, room temperature
pinch kosher salt
1-2 cups of your choice of mix-ins (toasted nuts or seeds, dried fruits - I used chocolate chips)

You are supposed to use edible rice paper on both sides of this sticky treat and if you plan on packaging and giving out to friends or storing for a while it would be wise to find some. I didn’t and I just used parchment paper sprayed with cooking spray and for serving in our house it worked out just fine.
Prepare and 8×8 inch baking pan with parchment paper or rice paper sprayed with cooking spray. I used a baking sheet, covered in parchment and sprayed generously with cooking spray.
Combine sugar, honey and 2 tablespoons of water in a small saucepan. Stir over medium heat until the sugar dissolves. Attach a candy thermometer to the side of pan. Increase heat and boil until thermometer registers 280 degrees.
Meanwhile, beat the egg white and salt in a stand mixer fitted with a whisk attachment until soft peaks form.  With the mixer running, slowly and very carefully, stream hot syrup into egg whites. Beat until the meringue is thick and has cooled slightly, about 10–12 minutes. Remove the bowl from the mixer and your chose mix-ins to the meringue; mix nougat with a rubber spatula to distribute evenly.
Spread the nougat on the prepared pan. Top with second sheet of rice paper or sprayed parchment.  Use spatula to press the nougat into an even layer.   Let nougat set at least 2 hours, but overnight is best.
Cut with a knife and store in an airtight container for up to 1 week.

Enjoy!

Tuesday, March 6, 2012

Oreo Tuffles


Did you know that today is the 100th birthday of the Oreo cookie?

To be honest, I didn't know that until I saw lots of friends posting about it on Facebook throughout the day... but finding out late doesn't make it any less important to celebrate!

I just so happened to have a bag of Oreos in the pantry. There was a recipe that I have been wanting to try for quite some time, and when I found out about the big century mark today, I decided to wait no longer. Today would be the day that I would finally try to make Oreo Truffles.

The process is actually quite simple, and you only need three ingredients.

Ingredient and step number one: Oreo cookies. A whole bag of them. Empty the whole thing into a zip-top bag... well, after you sample one or two. To check for freshness, of course...


Then crush them. I used my rolling pin.


Little man (perched on my hip for much of this endeavor...) wanted in on the action. He used his foot.


I promise, the cookies were sealed inside the bag.

The next ingredient is cream cheese. One 8-ounce bar at room temperature.


Simply mix the two together. I used my stand mixer, due to the aforementioned baby on the aforementioned hip. If I'd had two free hands, I would have just done it by hand.


Once the crumbs and cream cheese are well incorporated, simply roll the "batter" into balls. I placed the rolled balls onto a parchment covered cookie sheet, then let them chill in the fridge while little man and I went to pick little miss up from school.


Then there is one final ingredient.

Chocolate.


I used white chocolate melting wafers, as those were what I had on hand. You can use any kind of chocolate you want.

The idea here is to melt the chocolate and coat the cookie/cream cheese balls beautifully to create the completed truffles.

One problem.

I am probably the worst chocolate melter in the world. Seriously, I have no idea what the problem is. And I do it worse and worse every time I try. I always have super high hopes going into it... like, "I couldn't possibly do a worse job than the last time I tried!" and yet...

Yeah, so my chocolate wafers never melted into a soft, smooth, pour-able consistency. It stayed way too thick.

I am blaming the fact that the wafers were probably a little old... and I'm sticking to that.

So instead of dipping the balls, or gently pouring the chocolate over them, I kind of spread it. Think frosting.


So while they are not the most attractive Oreo truffles you will see on this 100th birthday celebration, they were still delicious. I can't believe it took me so long to try them. Daddy wants me to try using dark chocolate as the coating next time. Which means I'll definitely be making them again.

Happy 100th birthday, Oreo!


Easy Orea Truffles
(from allrecipes)

1 16-ounce package Oreo chocolate sandwich cookies (or, you know, a generic approximation...)
1 8-ounce package cream cheese, room temperature
16 ounces chocolate (chips, baking chocolate, wafers...)

Crush the cookies, either in a food processor, or by placing them in a zip-top bag and using a rolling pin. Combine the crushed cookies with the the cream cheese and mix well, until well blended. Roll the mixture into balls. The recipe on allrecipes says you can get 42 balls out of this mixture. I made mine bigger than they must have expected, and got 24. Make them as big as you'd like. I then cooled the prepared balls in the refrigerator for an hour to make them easier to dip.
Melt the chocolate (over a double boiler or in the microwave) and dip each ball in the melted chocolate.
Place the dipped truffles onto a wax paper or parchment covered cookie sheet and refrigerate at least one hour prior to serving.

Enjoy!

Saturday, August 27, 2011

August Daring Bakers' Challenge - Candylicious!

The August 2011 Daring Bakers’ Challenge was hosted by Lisa of Parsley, Sage, Desserts and Line Drive and Mandy of What the Fruitcake?!. These two sugar mavens challenged us to make sinfully delicious candies! This was a special challenge for the Daring Bakers because the good folks at http://www.chocoley.com offered an amazing prize for the winner of the most creative and delicious candy!

Wait, did that say candy? Well, there is no better way to get the attention of a sweet tooth or her five year old daughter than to mention the word candy. From the moment I read the challenge this month, I was excited. Now, you know my opinion about when the challenges include contests, but not even that could dampen my spirits.

Lisa and Mandy (two totally awesome ladies and amazing foodies) provided a whole lot of recipes as inspiration for us, and challenged us each to make (at least) one chocolate and (at least) one non-chocolate based candy.

The first candy that I decided to try was one for which they provided a recipe, and it is called pate de fruit. Pronounced "pat du fwee," this is basically a fresh fruit jelly candy. I love anything fruity, and a fresh fruit candy seemed right up my alley. Unfortunately, the only fruit of which I had an abundance at the time was bananas. Do a google search for banana pate de fruit. Not a lot comes up. Undeterred, I tried anyway.

Little miss helped me peel and chunk up my bananas.


Then using my immersion blender, we turned the bananas (plus one peeled, chunked up apple, for the natural pectin in it and to add just a bit extra...) into a puree, which we then cooked on the stove top over medium heat to 225 degrees.


The cooked jelly is then poured into a pan and sprinkled with some sugar, than left to set.


Once the jelly sets, it can be cut into shapes, rolled in some sugar, and, voila! Beautiful candies! Right? Well, mine never quite set enough. I tried to make little pate de fruit dots using my apple corer.


Umm... okay, they stuck. Using a toothpick to get them out, I kept trying...


They look pretty good, right?
Now look at them from a different angle...


Umm... I don't think they are supposed to ooze down through the rack like that... Not wanting to scrap all the hard work, I scooped the rest of the jelly into a jar, and now have candy flavored jam instead of, well, candy.


Not to be deterred, and inspired by another Daring Baker on the forums, I decided to try a different non-chocolate candy - rock candy. I mean, what a fun science lesson for the five year old, right? Growing our own sugar crystals? Cool!

So we wet and sugared some lollipop sticks to provide something onto which our sugar crystals could grow.


We then made a super saturated sugar syrup (twice as much sugar as water), which we boiled, flavored (using candy flavoring concentrate) and colored in rainbow colors.


We set our sticks into the jars (and glasses), we then set the whole thing aside and waited excitedly to watch our candy grow.

And then we waited some more.

And some more.

We saw sugar crystals grow, all right... just not on the sticks.


Yeah, that is a pretty rainbow of hardened sugar on the glasses. As for our rock candy lollipops?


Not so much.

Trying not to get too discouraged, I actually tried again. This time using string instead of lollipop sticks, just to see if that was the problem.


It wasn't. I don't have a picture of the final fail on this one, but suffice it to say it didn't fare any better than my sticks. Daddy tried to make the best of the situation by using some of our rock candy syrup as simple syrup to make us some mojitos, but, well, that didn't work out so well either...

Ever vigilant, I tried another non-chocolate candy, again inspired by another Daring Baker in the forums. She showed us some super cute, super easy gummy candies, made using a package of jello, extra unflavored gelatin, and a little bit of water. Little miss helped me make this one.


The resulting liquid is then poured into candy molds. I used a cupcake-decorating sqeezy tube to make it a little easier for little hands to help.


The resulting gummies were... okay. They tasted like highly concentrated jello (which, well, they are...), but had a kind of weird consistency. And, while they were easy to peel out of the candy molds, they stuck to everything else, including the paper plate onto which I put them fresh out of the candy molds... So I rolled them in some white sugar to relieve some of the sticking.


I can't call them a complete fail, because I think they worked out how they were supposed to, but I can't not call them a fail, because a day later, they were almost impossible to chew - it was like chewing a chunk of rubber. Not pleasant. Oh well.

On to the chocolates, shall we??

Lisa and Mandy provided us with several scrumptious looking chocolate recipes as well, and I decided to try to make truffles. I made two kinds - plain milk chocolate, and mint-milk chocolate. The process for making the truffles themselves is straightforward - make a simple ganache, let it set, then shape it into truffles. The ganache is simply chopped chocolate melted by being mixed with simmered heavy cream. Easy peasy, right? And to make the mint? Simple - just add some fresh mint leaves to the cream as it simmers!


I let the mint steep in the cream for an hour, then reheated it and strained it over my chopped milk chocolate bits.


Once all of the chocolate was melted, I set the bowls aside to cool a bit, then into the fridge to set completely.

When I was ready to make my truffles, I simply scooped:


and rolled (with a little help from some little hands):


I then set my rolled ganache truffles into the fridge to harden back up, as I was really hoping to coat them in lovely tempered chocolate. Note my classy sticky note reminding me which are the plain milk chocolate and which are the mint ones...


Now, tempering chocolate was kind of the whole point of this challenge. Unfortunately, tempering chocolate is quite an exacting process. It requires time, patience and a specific kind of candy thermometer. None of which I possess. Did that stop me? Nah! I chose to try tempering my chocolate using a method called seeding. Basically, chocolate pieces are slowly melted over a double boiler, then the temperature of the melted chocolate is carefully lowered by mixing in unmelted pieces of chocolate. Make sense? The temperatures are also very specific, but without a chocolatier's thermometer, well, I couldn't control that so well. But I tried.


Because tempering is usually easiest with larger amounts of chocolate, I decided that, in addition to coating my truffles, I would try to make another kind of chocolate candy as well. And since my truffles were safe in the fridge, I started with my molded, filled chocolates. I painted my mold (okay, a silicone ice cube tray) with my "tempered" chocolate.
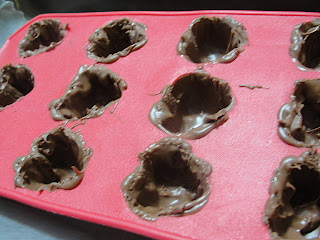

For my filling, I chose a delicious cinnamon caramel sauce that I have made before. But someone must have told the caramel sauce that I was making it for this challenge. And we all know my track record so far on this challenge. For the first time ever in my caramel-sauce-making history, my caramel crystallized.


Seriously?? Luckily it wasn't too bad, and after straining, the sauce was fine.

Once again using my cupcake decorating squeezy bottle, I filled my chocolate painted molds.


By this time, though, my "tempered" chocolate had cooled, and had become hard to pour. Umm... that was quick... I tried to bring it back up to temperature, but, well, I had no idea what I was doing. Daddy helped me, too, giving his attempt at re-tempering the chocolate, and we somehow managed to get all of the caramel covered with chocolate, sealing off the candies.

When it was time to pop them out of the molds, this was the result:


Umm... those look frozen, don't they? They aren't I promise. They just don't look tempered at all. Or even all that attractive for that matter, truth be told.

They tasted delicious, the cinnamon caramel and milk chocolate tasting delicious together, but they will not win any awards. Anywhere. And unless they were refrigerated, they were also a little messy to eat.


As for the truffles, well, they didn't fare much better. We managed to coat a few in the "tempered" chocolate, but had so much trouble that we soon gave up. So the truffle on the left is the milk chocolate, simply rolled in sweetened cocoa powder and the one on the right is the mint chocolate, with a milk chocolate coating.


They turned out alright, but not fantastic. The mint chocolate set much firmer than the milk, so while they look the same in these photos, that is only because they were stored in the fridge.


A few minutes later, the milk chocolate truffle (on the left) was super soft and mostly lost its shape. Oh well.

So, if you're counting along, that is one pate de fruit, two attempts at rock candy, one batch of gummies, two types of truffles and one attempt at filled chocolates. None of which worked how they were supposed to. Challenge 7, me 0. Ouch.

So to make myself feel better, I also made some peach fruit leather. Because little miss thinks it's candy, and I will encourage her to think so.

In reality, it's fruit. Lots of peaches, one third of a cup of sugar.


The fruit is cooked down, then blended smooth with the immersion blender.


The syrup (which, by the way, would be awesome as, well, syrup!) is then spread onto a rimmed baking sheet and set in a (very) low oven all day. Or as long as it takes.


The result is delicious. We roll it, then use kitchen scissors to cut strips as we want them.

Simple, delicious, and decidedly not a fail.

Lisa and Mandy, you ladies are awesome. Daring Bakers? I am in awe and, to be honest, very jealous of all of the results I saw on the boards this month. Hats off to all of you for some beautiful, delicious looking candies.

I highly recommend you check out the sweet confections prepared by our bakers this month. You won't be disappointed.

Wednesday, June 8, 2011

Strawberry Fruit Leather

I have often seen recipes for fruit leather, and have been somewhat intrigued by them. I don't know why, but, no matter how intrigued I was, I was just as skeptical, and never actually seriously considered making any fruit leather.

Until last week.

After our strawberry picking outing last week, I was looking for new and interesting ways to use my pounds and pounds of strawberries. And that is when the idea of preserving them hit me. I have a few jars of strawberry jam canned and in the pantry from the last time that strawberries went on super-sale at the grocery store (and yes, I know that jam with hand-picked berries would be better), so I wanted to try something different. So what are alternative preserving methods for fresh berries, other than jams or freezing them? Drying them. And if I am going to go the drying route, why not re-think the fruit leather idea?

I looked up several recipes, and landed on this one, mostly due to its simplicity.

I cut up enough berries to fill my two cup measuring cup twice (so, you know, four cups of cut berries) and cooked them down with half a cup of water. You can multiply or divide the recipe however you want, but the basic formula is half a cup of water for each four cups of fruit.

Once the berries were cooked and soft, I used my potato masher to, well, mash them up. I could have (and, arguably, should have...) used my immersion blender to really get a good, fine puree, but I was going low-tech this time. To the mashed berries, I added a little bit of vanilla sugar (seriously, I think I used about a tablespoon or so for the whole thing - the berries themselves were deliciously sweet) and a splash of orange juice. The recipe called for the juice of a lemon, but I had no lemons in the house. Or limes. But still wanted to give it the touch of citrus. So a splash of OJ it was.

Once the sugar and juice were mixed in, the mixture was again simmered until it began to thicken slightly. Mine didn't thicken all that much, but I wasn't overly concerned about that. The cooked berry puree was then carefully poured (I ladled mine, actually) onto a plastic-wrap-lined rimmed cookie sheet.

Then comes the long part.

I preheated my oven about as low as it can go:


Hi there! See me?

As you can see, I chose to go just a bit about the lowest setting, as my oven doesn't reliably hold it's temperature that low. The pan then went into the oven and, well, stayed there all day. Aaaaallllllll day. The fruit leather is done when it is dried out and not at all sticky to touch. Then just pull the pan out, let it cool for a bit (it cools quickly), and roll it up in the plastic wrap. Then you can cut the plastic wrap roll into shorter widths for individual sized portions.

I have to say, I was really happy with how this turned out! It had more texture to it than commercial fruit leather (fruit roll ups), but that can be corrected (if you want - I actually liked the texture...) by using a blender and, if desired, by straining out the strawberry seeds. And I felt good about letting little miss eat this (she thought it was candy!), whereas I don't at all like her to have the sugar, high fructose corn syrup and fake food dye heavy commercial versions.

I can't wait to try this with other fruits. I think, at the very least, raspberry and peach fruit leather are in our summer plans!


Strawberry Fruit Leather

4 cups strawberries, stemmed, hulled and cut
1/2 cup water
lemon juice (to taste)
sugar (to taste)

Bring the berries and water to a simmer in a covered pot over medium heat. Allow the fruit to cook for 10-15 minutes until fully soft. Using a potato masher, mash the fruit until smooth. (You can use an immersion blender for this, or, if you wait until the mixture cools, you can use a blender or food processor). Add sugar one tablespoon at a time for taste (it probably won't need much) and a touch of lemon juice if desired. Simmer the mixture for another 5-10 minutes until it begins to thicken.
Spray a baking sheet with non-stick cooking spray, then line the sheet with plastic wrap. Pour the mixture evenly onto the plastic wrap until it is about 1/8 of an inch thick. Bake the fruit mixture for 8-12 hours at your oven's lowest temperature.
Allow the fruit leather to cool before rolling and cutting.

Enjoy!
Related Posts with Thumbnails