Monday, July 30, 2012

Scottish Oatcakes

One of the fun parts of the Daring Kitchen challenges, aside from meeting great, talented people, learning about new foods and processes, and, you know, eating delicious things about which I never would have known is seeing the other members' interpretation of each challenge as I read as many of the posts as possible.

This past month's cracker challenge was no exception. In fact, the huge variety of crackers that were made this month was nothing short of inspiring. But there was one variety of crackers that I first saw here, on Makey-Cakey (a super fun and delicious blog that I highly recommend checking out), that I knew I would be trying. They are called Scottish Oatcakes, and they looked simple, rustic and absolutely delicious.

So guess what.

I made them this morning.

 They come together pretty easily - I used old fashioned oats, mixed with a touch of baking soda and salt, and then poured in hot water into which a tablespoon of butter had been melted.


I wanted to try to add a touch of sweetness to these, so I decided to add in a tablespoon of maple syrup as well.


(Oatmeal... maple syrup... it goes, right??)

Then, once the dough comes together, simply roll and shape. We used little cookie cutters. You can use whatever you'd like.


Now, little man tried to help me make these. Of course, being one and a half years old, his idea of help and mine were a little different... he wanted to quality test the cookie cutters... in his mouth. He also wanted to taste the dough. Needless to say, there was a lot of mid-process hand and equipment washing going on.

But after 20 minutes in the oven, we were ready to do the real tasting.


I have to say, these were fun and delicious. Simple, definitely rustic, and very, very easy to eat.

Some sunbutter and jelly made for a tasty mid-morning snack, too.


I will say, next time I make them (and there will be a next time), I will make an effort to consistently roll them a bit thinner, as I really preferred the crispier ones.  And I may play with flavorings - sweet, savory - I think these can be easily and deliciously adapted.

Who knew homemade crackers could be so much fun??


Scottish Oatcakes
(from Makey-Cakey, from Greedy Gourmet)


2½ cups medium oatmeal, plus extra for dusting (I used old fashioned oats, and flour for dusting)
¼ teaspoon baking soda
¼ teaspoon salt
3/4 cup water
1 tablespoon unsalted butter
1 tablespoon maple syrup

Preheat the oven to 350°F.
Combine the oatmeal, baking soda and salt into a large bowl.
In a small saucepan, heat the water and butter until the butter melts.
Make a well in the center of the oatmeal mix, pour in the liquid and use a palette knife to mix everything together. The mixture will initially seem a bit wet, but the oatmeal will gradually absorb all the liquid to give a soft dough.
Lightly dust a clean work surface with oatmeal (or flour). Tip out the dough, then roll out to about 5mm thick. Use a cutter of your choice (cookie cutter, biscuit cutter... whatever you'd like) to shape the oatcakes. Re-roll any trimmings and continue to cut out the biscuits. (Cut biscuits can be frozen uncooked, for up to a month. Freeze flat before packing into bags or boxes.)
Brush off any excess oatmeal (or flour), then space the oatcakes over 2 baking sheets. Bake for about 20 minutes, carefully turning the oatcakes every 5 minutes or so to stop them from steaming and going stodgy. (I didn't turn mine, as the kids were running around, but will definitely do that next time to further crisp them.) When cooked, they should be crisp and lightly golden. Lift onto a wire rack and leave to cool. (Will keep in an airtight container for up to 5 days.)

Enjoy!

Friday, July 27, 2012

July Daring Bakers' Challenge - Crackers


Our July 2012 Daring Bakers' Host was Dana McFarland and she challenged us to make homemade crackers! Dana showed us some techniques for making crackers and encouraged to use our creativity to make each cracker our own by using ingredients we love.

This was a great challenge, as crackers have been on my to-try list for quite some time. And, as both of my kids love to snack on crackers, I was excited to dive right in. 

I made two kinds of crackers, but will definitely try many more varieties, thanks to this challenge.

The first crackers I made were sourdough crackers:


They were so good that I made them twice.

The second variety that I tried were little man's favorites - oyster cracker style crackers:


They didn't have quite the same crisp snap as the store bought variety, but were very tasty and well received.

Crackers really are pretty simple to make, so I look forward to making many more varieties!


Sourdough Crackers
(from I'm Naturally Simple)


1 cup sourdough starter
1 cup(ish) flour
1/4 cup melted butter (I substituted coconut oil the second time I made these and it worked beautifully)
salt and/or spices of your choice
melted butter or olive oil (your choice, I used olive oil)

Combine flour, starter, and butter.  Add enough flour to form a stiff ball.  Cover and let sit aside for at least 10 minutes.
After 10 minutes has passed roll dough out very thin.  Baste with melted butter or olive oil, sprinkle with salt and/or spices to taste. Cut dough lengthwise then cross wise to create cracker shapes.  Transfer to baking sheet.  Prick the top of each cracker with a fork.
Bake at 350 degrees for 10 minutes.  After 10 minutes has passed begin checking your crackers.  Depending on how thin you rolled them will depend on how quickly they cook.  My batches average 14 minutes.  You want the cracker to be crisp and lightly browned.  These burn quickly so pay close attention.

Remove from oven and let cool.  Leave them on the cookie sheet as they continue to crisp as they cool.  Cool completely before transferring to storage container.

Enjoy!


Oyster Crackers
(from Roti n Rice)


1 1/2 cups sifted flour
1/2 teaspoon sugar
1 teaspoon sea salt
1 1/2 tablespoons cold butter
1 teaspoon dry active yeast
1 tablespoons cold water
1/4 cup plus 3-4 tablespoons cold milk

In a small bowl combine 3 tablespoons milk and water, add yeast stir slightly with a wooden spoon. Rest
mixture for 5 minutes.
Combine flour, sugar, salt and cold butter in the bowl of an electric stand mixer and pulse until well
combined. Mixture will look like coarse sand.
Add remaining 1/4 cup milk and yeast mixture and blend until dough comes together to form a ball. If the
dough looks dry add another tablespoon cold milk. Allow the dough to rest 15 minutes at room
temperature.
Preheat oven 400 degrees F.
Roll dough out onto a well floured surface to 1/4 inch thickness, cut rounds using the large pastry tip or
other small circular cutter.
Cover ungreased cookie sheet with parchment paper, place dough rounds 1/4 - 1/8 inch apart.
Bake crackers for 10-15 minutes checking for doneness at 10 minutes. Gently shake the cookie sheet to
flip crackers for even browning, sprinkle with additional sea salt to taste and continue cooking until lightly
golden browned.

Enjoy!

Wednesday, July 25, 2012

Sweet and Sour Chicken

Have you checked out Pinterest yet?

It's basically visual bookmarking, and is an online version of the old school idea of tearing pages out of magazines and pinning them (literally) to a board. Only there's no limit on the number of boards you can have going or the number of pages you can pin to each board the way there is when you are dealing with actual wall space...

Anyway, in addition to being able to pin things that you find online at any point, it also lets you see what your friends have been pinning. Which can be a lot of fun. 

I mainly use pinterest for pinning recipe idea. Shocking, I know...

So recently I hopped on over to pinterest and saw that one of my friends had pinned a recipe for super easy sweet and sour chicken.  And as it just so happened, my local supermarket had a good sale on boneless, skinless chicken thighs. Perfect timing!

The recipe is pretty easy, but took a few steps.

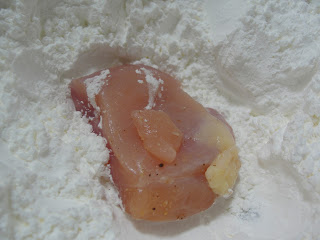
It started by cutting the chicken, seasoning them lightly with salt and pepper, then coating them in cornstarch.


The recipe actually calls for the chicken to then be coated in egg, but I skipped that step for various reasons.

The cornstarch coated chicken pieces were then fried until they were browned on all sides, then set aside in a baking dish.

Then came the easy part - making the sweet and sour sauce.  With a few simple ingredients that you probably already have on hand, all it takes is a minute of measuring and a few seconds of stirring.


I mean, seriously, it doesn't get much easier than that.

Then simple pour the sauce over the chicken pieces.


Give the chicken pieces a quick toss to make sure they're well coated...


...and pop the whole pan in the oven!

Flip the chicken pieces half way through the baking process, and then voila! Dinner is ready.


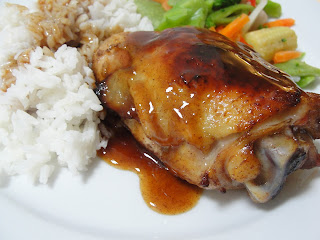
We kept it simple and served this chicken over rice, with a side of broccoli.


It's not quite like the sweet and sour chicken I'm used to from our local Chinese restaurant, but it was delicious, easy to prepare, and enjoyed by everyone. Little miss told me I could make it whenever I want, little man ate every bite on his plate, and daddy gladly took the leftovers for lunch the next day.


Deliciously sticky and sweet, this recipe is a keeper.


Sweet and Sour Chicken
(slightly adapted from Made It. Ate It. Loved It.)


For the chicken:
6 boneless, skinless chicken thighs
salt and pepper
a few tablespoons olive oil

Rinse chicken, trim off fat or extras and then cut into 1 inch cubes. Season chicken pieces with salt and pepper then dip them into the cornstarch to coat them fully. Heat oil in large skillet. Cook chicken until browned. Place in baking dish. Remove chicken from frying pan and place the pieces in a baking dish (I used a 12" x 8" pan and it was a tight fit, but it did all fit.)

For the sauce:
3/4 cups sugar
4 Tablespoons ketchup
1/2 cup white distilled vinegar
1 Tablespoon soy sauce
1 teaspoon garlic salt

Whisk all ingredients together until smooth, then pour evenly over chicken. Turn chicken so the sauce gets on both sides.

Place ing dish in a preheated 350 degree oven for 15 minutes. Turn chicken and then cook for 15 more minutes.

Enjoy!

Sunday, July 22, 2012

French Fougasse

I love having an excuse to try something new. I mean, it's not like I need much of an excuse to cook or bake, but having an actual excuse for it is nice once in a while! 

When I saw the theme for this month's Bread Baking Day, I was torn for a bit.  The theme was France. Now, I am not French, and I don't claim to know much about France. In fact, I know embarrassingly little about France. So my first thought was croissants. Or Pain au chocolate. Or brioche. All of which are absolutely delicious. And all of which I have tried my hand at, in one form or another, before.

So I turned to my trusty friend Google to try to come up with some new ideas. And that's when I saw the fougasse (foo-gahz), sometimes referred to as ladder bread due to its interesting shaping.

I started looking for fougasse recipes, but they were all very different. While not all of the recipes that I found followed this rule, I did see that many trusted bakers feel that a lean dough (one that does not include oil or some other fat) makes for the best results.  I was about to decide on using Peter Reinhart's recipe for French bread from the Bread Baker's Apprentice when I found this recipe. It looked so basic and simple that I just had to try it.

The recipe is very straightforward.

Incorporate a little bit of yeast into a lot of bread flour.


Mix in a bit of salt, stir in some water, then, when it begins resembling dough, turn it out onto your work surface.


To knead this bread, I am sure you could use a stand mixer with a dough hook, but the recommended method was actually one of stretching the dough out and folding it over itself. Repeatedly.  Despite the appearance of the "dough" in its barely incorporated state in the photo above, this dough is actually very wet (has a high hydration level), so this method of kneading is very effective.  And provides the baker with a bit of exercise. After a while, the dough begins to come away somewhat cleanly from the counter and becomes a bit less sticky. That's when you know you've done well.


No flour was added to the dough during the kneading - you don't want to mess with the hydration. The flour you see there was just sprinkled onto the work surface at the last minute so that the dough could be shaped (somewhat) into a ball and transferred to a bowl to rest.


The recipe said to allow the dough to rest for "at least" one hour. As we were pretty busy in the kitchen, ours rested for two and a half hours. And it seemed to have been a very productive rest for the dough!


The dough is than poured out, carefully, onto the work surface once again, where it is divided and shaped. I used half of the dough, which I carefully pressed into a vaguely rectangular shape with my hands on a cornmeal-dusted-parchment-lined cookie sheet, to create what seems to be the most traditional shaping of a fugasse. One cut through the center...


Surrounded by three diagonal cuts on each side.


The cuts are stretched a bit and the bread goes into a very hot oven.

While bread number one was baking, I divided the second half of the dough into two smaller portions and shaped them into triangles, each with three cuts.

I brushed each of these breads generously with olive oil, then sprinkled on seasonings - one was sprinkled with Herbes de Provence, one with coarse salt.


Then the first bread came out of the oven.


As soon as he saw it, little man said "wow!"

Then the other two baked.

The salted bread:


And the herbed bread:


I have to say, these had quite the fun look to them.

The plain one actually made me think that I should make these around Halloween time.. I mean, doesn't that look almost jack-o-lantern-y??


I definitely think we are going to always brush the tops with oil from now on - it gave the bread a really nice color, not to mention a bit of extra crispness to the crust.


But, most important, the taste test.

Daddy and little miss told me that this is the best bread that they have ever tasted.

Not that I have ever made - that they have ever had. Ever.  Now that is BIG praise.

Little miss said "Umm, mommy, I don't think these breads are going to last very long..."


And she was right. They didn't.

I will definitely be making this again.


(This post has been submitted to Yeastspotting, of the Wild Yeast blog)

Fougasse
(from J's Kitchen)

500 grams bread flour
5 grams active dry yeast
10 grams salt
375 ml water

Stir yeast into the flour until evenly distributed. Stir in salt, then water, and mix until the dough begins to form.
Transfer the dough to a clean work surface. Continue mixing/kneading the dough by stretching it out and folding it over onto itself repeatedly and from each direction. Continue working the dough until it comes away cleanly from the work surface and is not (or, for me, is less...) sticky.
Move the dough to a floured area of your work surface, and shape the dough into a ball (as best as you can - it is still a wet dough). Transfer the dough into a lightly oiled (large!) bowl, cover it with a tea towel (or plastic wrap) and allow it to rest for at least one hour.
After the dough has rested, turn it out (carefully) onto a floured work surface. Generously flour the top of the dough, then cover with a tea towel and allow it to rest for another five minutes or so.
Preheat your oven as high as it can go (500 degrees F, for me...)
Using a plastic scraper (or spatula, or whatever tool works for you), divide your dough as desired (depending on the size you want your finished breads, cut it into more or fewer pieces).
Make your cuts in the dough all the way through the dough (though not to the edges) to create the desired design in the dough. The traditional pattern is one long cut surrounded by three diagonal cuts on either side of it.
If desired, brush your shaped loaves with olive oil and sprinkle with seasonings to taste.
You can bake your bread either on your pizza stone (shape the bread on a well floured/cornmeal-covered pizza peel and transfer it to the hot stone) or on a baking sheet that has been lined with parchment and sprinkled with cornmeal.
Bake the bread for 10-12 minutes, until golden brown.

Enjoy!

Friday, July 20, 2012

Sourdough Surprises #5 - Sourdough Pizza

It's amazing all of the different things that sourdough can do. Which is what makes Sourdough Surprises so much fun!


This month's endeavor was a fun one, because it was a very simple recipe, but one that allowed for a lot of creativity in execution. This month we made pizza!


We found a sourdough pizza crust recipe that comes together super quickly and easily - simply combine sourdough starter, oil, salt and flour!


I started out stirring the ingredients together, and then kneaded it until it was a beautifully, smooth dough.

Now, as it happens, I decided to try out this sourdough pizza for family picnic on July 4th. So in order to make sure we had enough pizza for everyone, I decided to make two doughs. So, in addition to the sourdough dough, I also made a batch of my standard pizza dough, figuring that we could compare them  evenly.


Now, as you would imagine, the yeasted (commercial yeast, that is) dough rose more than the sourdough one (that's the sourdough in front, in the bowl with the pink handle).

I was a bit more surprised, though, to feel the difference in the dough. The sourdough crust dough was more delicate to work with, more prone to tearing if not handled carefully.


Our goal was to make six small pizzas, each big enough to feed one or two of us. That's the sourdough crust stretched on the front of that pan, and the standard one in the back.

Oh, and to make this a bit more fun (and challenging), and, you know, since many of us tend to barbecue on July 4th, we decided to cook our pizzas on the grill. For the first time ever (for us, that is).


The process took a little bit of getting used to, and was a little bit stressful at times, seeing as you have to be pretty careful with timing, but it worked out beautifully.

And deliciously.


The dough cooked amazingly, and we finally figured out how to get the cheese and toppings melty and delicious without burning the bottoms too badly!!

The result was a delicious pizza barbecue that was as tasty as it was fun.


And the funny part was that most people at the table couldn't tell the difference between the sourdough crust and the traditional one.  I could taste a bit of the sourdough tang, which worked really nicely, I thought, with our variety of toppings.


And we made sure that there was a little something for everyone - from veggies to meats, even a Mexican inspired pizza.


But I wasn't quite done. I wanted to have a go at baking the sourdough crust, too, to see how it tasted from the oven, rather than from the grill.

And, once again, I made two pizzas, side by side, to compare.

As with the first time, the sourdough pizza crust took a little bit more time to stretch out, but, again, just like with our grilling experience, the pizza cooked up beautifully.


And once again, the family couldn't remember which pizza had which crust!! For the record, I thought that the sourdough pizza crust was a bit crispier in this baked version than it's commercially-yeasted oven-mate, which I actually loved. 


So what kind of pizza did you make? Link up and show us!


Sourdough Pizza Crust
(from Sourdough Home)

1 1/2 cups sourdough starter
1 tablespoon olive oil
1 teaspoon salt
1 1/2 cups flour (I used the combination of 1 cup all purpose and 1/2 cup whole wheat)

Combine all ingredients and work them together until you have a smooth dough. I added the flour slowly. If the dough is too dry, add additional starter. If you don't have enough starter to do so, simply add water, slowly, until your dough is soft.
Once the dough has been kneaded, allow it to rest, covered, for half an hour.
When the dough has rested, roll it out to your desired shape and top as desired. Some choose to par-bake the crust before topping - the choice is yours.
Bake your pizza in a very hot oven. 450 degrees is what the recipe suggests, but some go hotter. The pizza bakes, usually, in about 15-25 minutes, but watch it carefully.
Enjoy!

Saturday, July 14, 2012

July Daring Cooks' Challenge - Cooking En Papillote

Man, summer is just flying by. I know, I know, I keep talking about time flying, but seriously? It's crazy.

Our July 2012 Daring Cooks' host was Sarah from All Our Fingers in the Pie! Sarah challenges us to learn a new cooking technique called "Cooking En Papillote" which is French and translates to "cooking in parchment".

While I have heard of "en papillote" as a cooking method (Gordon Ramsay even mentioned it on MasterChef!), I have never tried it. As soon as the challenge was announced, I had a whole bunch of ideas. And in the forum, people were posting absolutely delicious looking meals cooked in cute little parchment packets. Chicken, fish, all kinds of vegetables... you can even include pasta! Who knew?!

But one idea that stuck with me was dessert. I know, real shocker...

I found inspiration in this recipe for fruit en papillote. And while I didn't follow it it a tee, I am super glad that it inspired me.

I chose an assortment of in-season fruits, including peaches, strawberries, blueberries and cherries.


I combined them in a bowl, then prepared my parchment. Apparently, the most traditional way to cut parchment to create the packets is into heart shapes. Little miss loved that.


I then scooped a bunch of the mixed fruit into each paper heart, dotted the top with a little bit of butter (seriously, just a little!) and sprinkled the top with cinnamon sugar.


I then folded the parchment heart shut and folded/crimped the edges to seal the packet shut.


The packets were then placed onto a baking sheet and went into a 400 degree oven for about ten minutes.

When the timer beeped, I knew the fruit was cooked.


I guess I need a little practice sealing those packages...

But the results?


YUM.

Even better served over vanilla ice cream.


I fully intended to try this cooking method for a main dish, but time seriously ran away from me this month. So I promise to do so in the future, and I promise to share my results here when I do.

To see some of the delicious dishes cooked up in the Daring Kitchen this month, check them out here.

Sarah, thank you so much for introducing me to this cooking method - I am so glad to have tried it and look forward to trying it again, with all kinds of recipes!


Fruit En Papillote
(inspired by myrecipes.com)
 
1 peach, washed, pit remived and cut into chunks
1/2 cup strawberries, washed, stems and hulls removed, and cut into pieces
1/2 cup blueberries
1/4 cup cherries, pitted and halved
1 tablespoon butter, cut into pieces
1/2 teaspoon (about) cinnamon sugar

Preheat oven to 450 degrees.
Combine all washed and cut fruit in a bowl. Toss to mix.
Cut two to three hearts, about 8-10 inches each, out of parchment paper.
Scoop mixed fruit onto one side of each heart, making sure to leave room around the edges for sealing the packet.
Lightly dot the top of each scoop of fruit with butter, and sprinkle the tops with cinnamon sugar.
Close and seal the parchment packet(s).
Place packet(s) on a baking sheet and place the baking sheet into the oven.
Bake for 8-10 minutes. Bag will puff slightly and may release some juices.
To serve, either place a packet onto a serving plate and cut it open as a single serving, or, if your packets were larger, slice the packet open and scoop the cooked fruit into serving dishes. Top with vanilla ice cream or whipped cream if desired.

Enjoy!

Tuesday, July 10, 2012

Five Spice Honey Chicken

As I have mentioned many times before, one of my favorite aspects of the Daring Kitchen, other than the really cool recipes I have learned, is the people I have met. Well, not that I have met them in person... but I feel like, through their blogs, the forums, and through other social media through which we have connected, that I have gotten to know some really wonderful and talented people.

One of the awesome blogs to which I have been introduced is Chef In Disguise, which is written by the sweet, wonderful and supremely talented Sawsan. Sawsan's photos are always stunning, her recipes always look and sound mouthwateringly delicious, and she happens to be a wonderful and gracious person, to boot.

A few months back, Sawsan posted a chicken recipe that looked so tasty that I tried it the very night that I saw it.  And it was such a hit that I have made it several times since then.  It is so good, that I just had to share it with you.

The recipe is super simple, and does not have that many ingredients. The only ingredient that might not be standard in all houses is the five spice powder, a combination generally containing anise, cinnamon, clove, peppercorn and fennel. 


The five spice is combined with honey, soy sauce, a bit of rice vinegar and some ground ginger. The best part is that the recipe for the marinade is almost identical to that of the sauce, so I just measure them out at the same time so that I don't have to pull out all of my ingredients and measuring spoons a second time.


To marinate the meat, I simply place the chicken pieces in a gallon sized zip top bag, then pour in the marinade. Once the bag is zipped, I give it a gentle shake and squeeze to make sure that all of the meat is coated, then the bag can rest in the fridge until you are ready to cook.


I bake my chicken in the oven rather than grill it, but I am hoping to talk daddy into trying another batch of this on the grill. I don't think that should be too tough...

While the chicken is in the oven, preparing the sauce was simple, especially considering I'd already measured out most of the ingredients. Once the base of the sauce comes to a boil, just pour in a slurry made from cornstarch and water, then cook it until it thickens.


I serve this chicken with rice, but you can serve it however you would like. I always spoon lots of sauce onto both the chicken and the rice.


This dish is always a hit with everyone in the house. Little miss and little man each eat a whole thigh without complaint, and sometimes even ask for seconds.


So thank you, Sawsan, for this delicious recipe that has become a regular in our house!!


Five Spice Honey Chicken
(from Chef In Disguise)

5 chicken thighs

For the marinade:
2 tablespoons honey
1/4 cup (80 ml)soy sauce
2 tablespoons rice vinegar
1 teaspoon five spice powder
1/2 teaspoon powder ginger

For the sauce:
2 tablespoons honey
1/4 cup (80 ml)soy sauce
2 tablespoons rice vinegar
1 teaspoon five spice powder
1/2 teaspoon powder ginger
1 cup chicken stock
2 teaspoons cornstarch
2 tablespoons water

(the sauce is the same as the marinade, with the addition of the chicken stock, cornstarch and water)

Mix together the marinade ingredients. Place the chicken thighs into a zip-top bag, pour in the marinade and let it marinate for at least 30 minutes.

Drain the chicken and cook on a lightly oiled grill (or grill or barbecue) until browned on both sides and cooked through. I usually just cook mine in the oven at 375 degrees for about an hour, turning the pieces half-way through, and, when I am really on the ball, draining out the liquid with a baster before they are done cooking so that the skin has a chance to crisp up, rather than the meat braising in its own liquid.

While the meat is cooking, combine the sauce ingredients, with the exception of the water and cornstarch, in a small saucepan.
In a separate small bowl, whisk together the water and cornstarch, then pour that slowly into the saucepan with the boiling sauce, stirring constantly. Continue stirring and cook the sauce until it thickens.

To serve, spoon the sauce over each serving of chicken.

Enjoy!
Related Posts with Thumbnails